The Content Marketing Formula
1. Introduction
In the “good old days”, when Google was hungry for good new content, you could simply publish a few hundred words on your blog, and you’d rank in the search engines.
The more content you’d produce, the more visibility and reach you’d get. And … the more subscribers and sales you’d generate.
Not anymore.
Today, our audience is splintered across a myriad of social media sites and content channels.
And there’s no shortage of content on the web.
To ensure our content is discovered and noticed by as many people as possible across all these social and media channels, we’ve got to amp up the “marketing” behind each piece of “content” published.
In this Implementation Checklist you’ll learn a structured content marketing process you can follow to ensure the content you create:
- Is valuable and in-demand by your audience
- Is considered shareworthy by influencers in your market
- Reaches as many people as possible in your existing audience
- Reaches as many new people as possible who may not yet know you
- Encourages subscriptions and sales
1.2 Content Marketing Network Architecture
Your “content marketing network” includes:
-
Your main site, on which will reside the original content (including opt-in and possibly sales pages).
This site serves as the primary destination pages for your traffic and it’s primary goal is to use interesting and valuable content to interested people into an opt-in and sales process.
The rest of the network is for generating traffic to the content from new and existing subscribers and customers.
-
Your “audience connection network”, including the social and content media channels that connect you to your existing audience (email subscribers, fans, followers, channels, podcasts, etc).
The purpose of these channels is to feed traffic from our social connections to the main site. You will put “teaser” content to hook people’s attention and lead interested people to the main site.
-
Your “Influencer” network, consisting of colleagues, industry leaders or celebrities, and popular websites who share our content with their audience.
The influencer network will share your content with their own audience and send new visitors to the content on your main site. This is especially valuable traffic because it is endorsed by the influencer, so site visitors are likely to be favorably predisposed to you and your content.
-
Paid/Retargeted advertising to amplify your content to your existing audience as well as to reach new audiences of prospective customers.
The advantage of paid advertising is that, subject only to your budget limitations, you have instant access to hundreds of thousands, millions, even billions of people to advertise to.
In this Implementation Checklist we walk through the steps of using this model to publish and promote your content, including how to:
- Set up a content marketing process that works for your business and audience;
- Produce content topics that are of high interest and demand in your market and is strategically written to encourage subscriptions and sales; and
- Systematically publish and promote the content to your existing audience, and to expand your reach to large new audiences.
Use this process habitually for each piece of content you produce to make sure the content you so carefully create gets the most exposure possible and leads to more subscribers and sales for your business.
1.3 How To Use This Implementation Checklist
Here’s how I recommend you use this Implementation Checklist to get the most benefit:
Skim through the Implementation plan all the way through to get a “bird’s eye view” of what you’ll be doing and why.
Don’t stop to get into the details of how it’s done, but do note the sections that you’ll want to spend more time with as you skim.
After a small break to let the “big picture” sink in, take a second pass through the checklist and understand how each step is done, and spend a little extra time on the sections you noted. If you need to, reach out in the community to clarify anything you don’t understand.
In some cases, an Implementation Checklist uses the output of other Implementation Checklists as inputs. In that case, you’ll want to complete the other Implementation Checklist before continuing with the current one.
When you’re ready to get into action, download any worksheets or other resources provided in each section (if available) and follow the action steps in the checklist.
Completing this Implementation Checklist will ensure you consistently produce interesting, relevant and valuable content; and promote it actively to maximize it’s reach and efficacy.
1.4 Recommended Pre-Requisites
The success of this content marketing model hinges on how well our message matches the market.
As with most of our marketing strategies, a deep understanding of the people we want to attract – our “avatars” – will greatly assist to achieve this.
So if you haven’t already, I recommend you complete the “Market Potential Acid Test” and “How To Create Your Avatar” Implementation Checklists to complete your Avatar research before you start this Implementation Checklist. The outputs from those checklists will be helpful in this one.
Also, the process we’re using in this Implementation Checklist to select topics that are in demand are relevant is essentially the one used in the “3-Step Lead Magnet Creation Blueprint” Implementation Checklist. You’ll want to refer to that frequently for details on implementing the steps we outline in the content production of this document.
2. Prepare
In this section we’ll discuss setting up the various parts of your content marketing network to prepare for publishing and promoting your content effectively.
You’ll set this system up once before you start publishing content, and then update it periodically to adapt to your new marketing and advertising technology, or as your audience needs and interests change.
Use this network every time you publish content to reach as many targeted, qualified people as possible and to grow your subscribers and sales.
We recommend using WordPress (installed on your own domain and hosting) as the main website/blog for your business or brand.
You can download the software from WordPress.org and use WordPress’ famous “5-Minute Install” instructions to install it on your hosting.
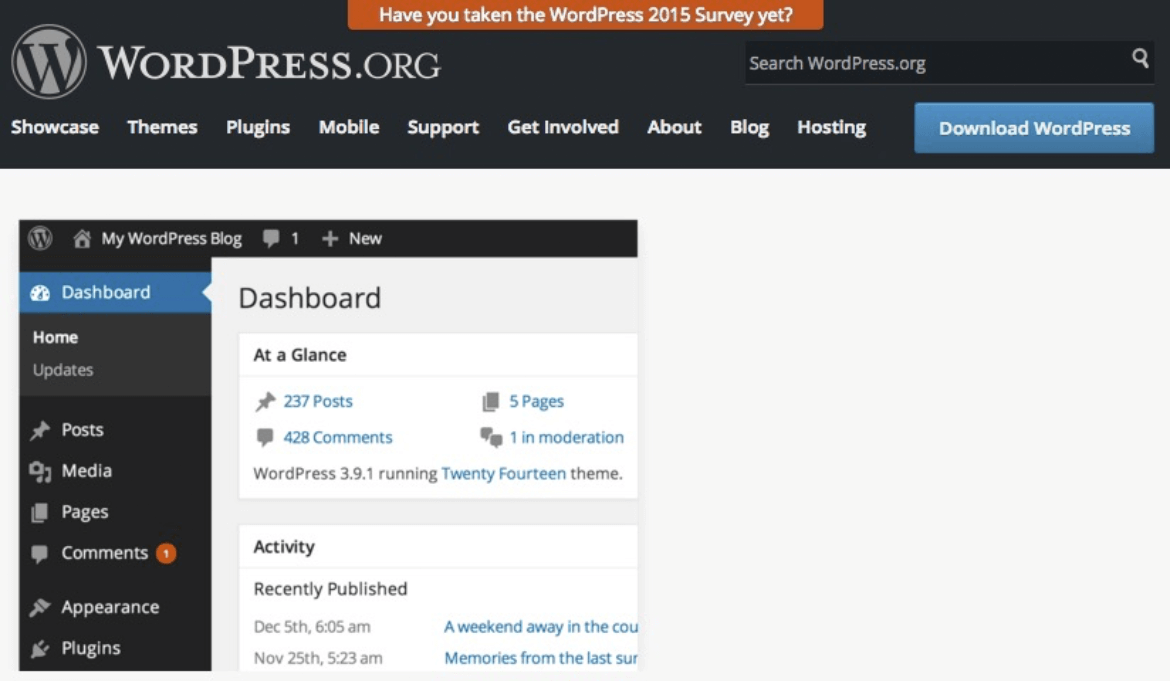
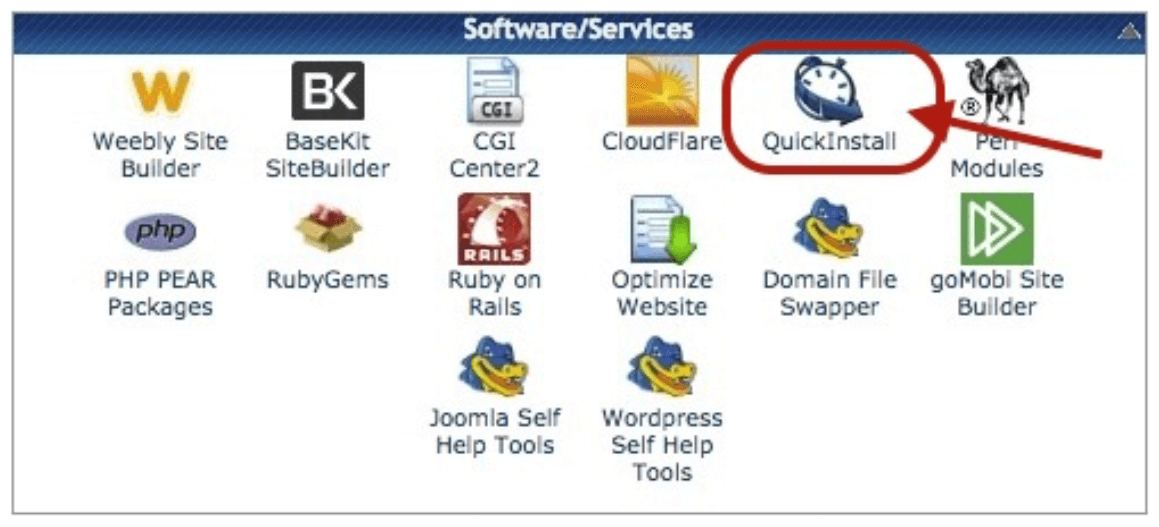
Also, many hosting services provide fast 1-Click WordPress installation through the “Softaculous” or “QuickInstall” service provided in your web hosting control panel:
If you’re a bit tech-shy, or want to absolve yourself of the need to install, maintain, backup and secure your website, you might prefer an all-in-one content management platform built on WordPress.
These platforms will generally give you less control and flexibility, but the tradeoff is reliability, security, speed, ease of use, and no maintenance.
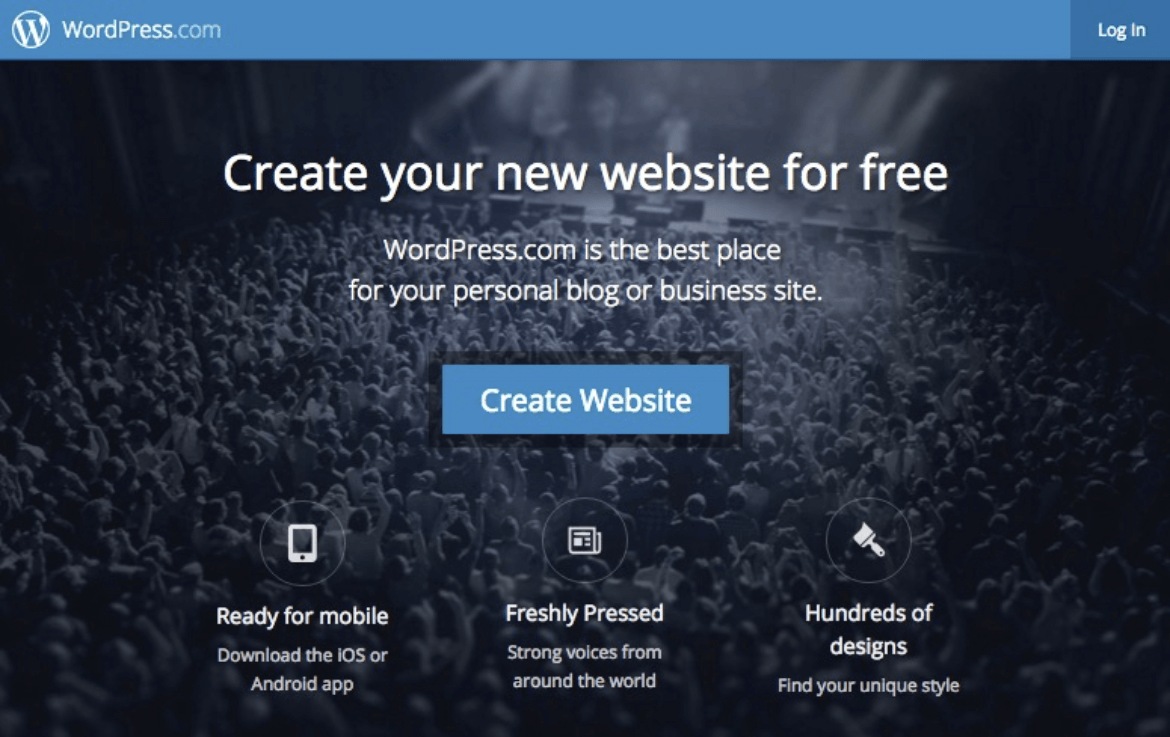
For example, you may choose to use WordPress.com to host your blog. (If you do this, be sure to use the paid version that allows you to use your own domain name – e.g. Joesblog.com – and not the free version which requires your site URL to be a subdomain of wordpress.com – e.g. joesblog.wordpress.com).
RainmakerPlatform.com is also another excellent alternative.
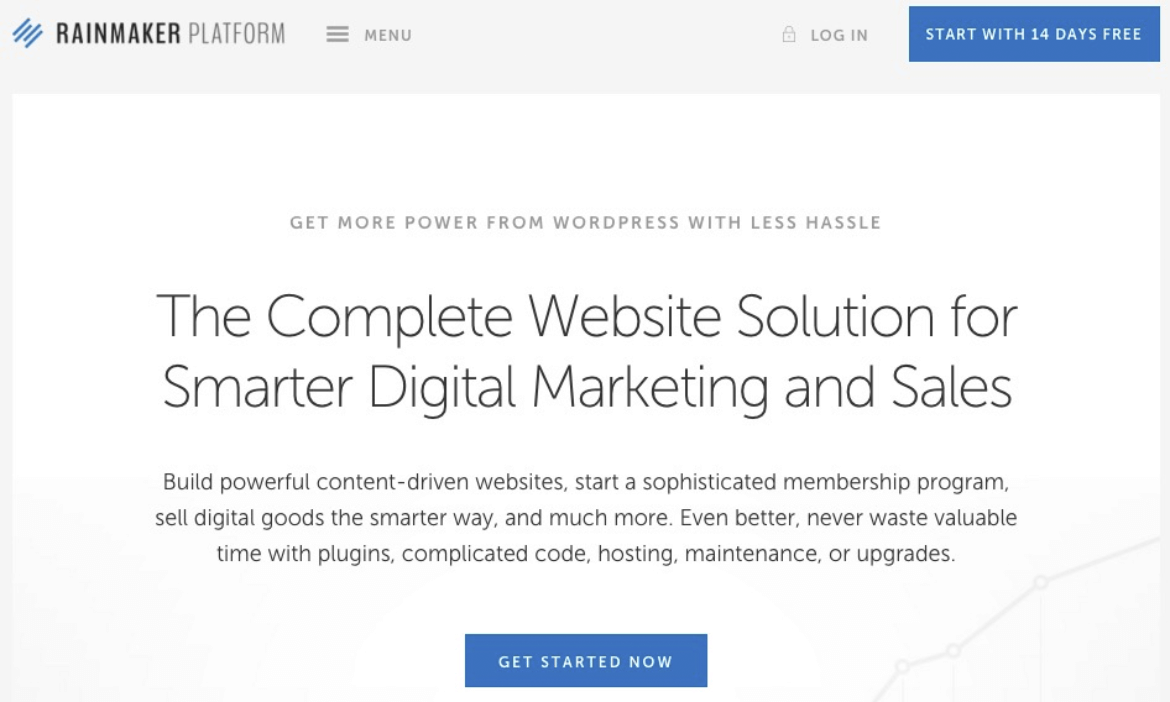
Although it’s a premium paid platform, it provides a wealth of additional functionality built in, including membership site, SEO, ecommerce, and other features.
2.3 The Audience Connection Network
Your “Audience Connection Network” consists of all the media and channels you use to connect with your audience, including:
Your email subscriber list. This a key part of your connection network. They will typically be your most interested and qualified prospects.
You want to be sure your subscribers are aware of any and all new content that you publish. It will add value to their subscription, and enhance your position as a credible and trustworthy advisor.
“Social” channels (e.g.: Facebook, LinkedIn, G+, Twitter) that you will use to interact with and engage your community, and to promote your blog content;
“Media” channels (e.g. Youtube, podcasts, etc.), that you will use to provide value-added content to demonstrate authority and build an audience, and to lead people to your blog content or opt-in offers.
Your audience connection network is your main source of communication with your audience, and a primary way to drive traffic to your main web site.
2.4 Building Your Audience Connection Network
As you likely know, there are countless social and content media channels, with more new ones appearing constantly. But you don’t need a presence on every one to do effective content marketing.
Focus only on the content and media channels:
- Your audience uses frequently and in large numbers; and
- In which you enjoy engaging and for which you enjoy creating content.
As an example, I’d recommend one of these social connection networks for the “Expert / Advisor” and information publishing businesses:
- If you’re just starting out: Facebook, Google+ and Youtube.
- If you’re building momentum: Facebook, Google+, Youtube, LinkedIn and Twitter.
- If you’re growing your reach fast: Facebook, Google+, Youtube, LinkedIn, Twitter, Pinterest, Instagram and a Podcast.
Choose as many channels as possible, but only as many you can engage with regularly and efficiently. Use an 80/20 approach here – you can always add more channels later as your increased sales will pay for additional team members to manage it all.
Your influencers network includes colleagues, industry leaders and celebrities, and popular websites in your niche.
Influencers are a very important part of your content marketing network because they already have access to an audience consisting of our ideal prospects.
When they share your content with their audience, they become another channel to new – and sometimes large – audiences for you.
More importantly, when influencers curate your content for their audience, you’ll inherit some of the trust and respect they’ve built with their audience.
These site visitors are more receptive to your message and represent a much “warmer” potential lead compared to other organic or paid traffic.
When they link to or share our content, our connection network effectively extends to include the influencers’ own connection network and expands your reach – sometimes very substantially.
Here are the steps to follow to create a valuable database of influencer intelligence:
- Create a list of top influencers in your niche and keep it up to date over time. Start with at least 25-50 influencers, and build it over time to be a comprehensive database of influencers in your niche.
- For each influencer, keep track of their main website URL’s, the keywords for which their sites are optimized, the main subject areas they deal with, and their most popular content. Your favorite spreadsheet program is an effective and simple way to keep track of this information.
- Set up a spreadsheet (database) to maintain this database of influencer intelligence.
- Subscribe to each of these influencers’ email list to keep your pulse on what their current topic priorities are. Review this information once a week looking for trends and current promotions that give you insight to when to reach out to each influencer, and what they care about most.
If you use email to subscribe, consider creating a separate email account only for the purpose of collecting this information. This way, it won’t distract you daily and you can control when you set time aside to review them.
Another good option is to subscribe to influencer RSS feeds using a feed aggregator like Feedly.com.
3. Paid Advertising
While content and social marketing are important and worthwhile, they are effective as long as you continuously feed content into your connection network over many months to generate any meaningful results.
It’s helpful, then, to use some paid advertising to accelerate the growth of your connection network.
It does require an investment, but the trade-off is that more people come in to your connection network faster and – ultimately – sales processes.
Because it does require cash investment, and at least a working level of expertise, I recommend you use one paid advertising strategy at a time. Once you have it paying for itself, you can more easily add additional paid advertising.
Today, Facebook is one of the easier advertising channels to use, and the prices for access to the audience is still relatively affordable.
It’s the main advertising medium I recommend you consider first.
If Facebook isn’t a fit for your target audience, you might then consider one of these alternatives:
- Google Display/Placement Advertising
- Google Search (Adwords)
- Bing Search
- Ezine / Solo Ads (if you can write good ad copy)
Retargeting is an increasingly important element of your paid advertising, and one you should be preparing to use today.
Retargeting is a process whereby your website places an identifier (also called a “cookie” or “tag”) on your visitors’ computer so you can continue to show your ads to that use on any other website on the internet that displays ads from the advertising network you’re using.
Retargeting is a very efficient way to pay to advertise only to people who’ve previously visited your website. They are a more valuable prospect for you because their visit indicates an active interest in you and/or the subject matter of your website.
Keeping our ads in front of that visitor even when they’re not on our website is the “next best thing” to having their email address.
Facebook Retargeting
Let’s say you’re advertising on Facebook. Facebook gives you a small snippet of code that you place on your website (often referred to as a “retargeting pixel”).
This unobtrusive bit of code places your Facebook Advertising “identifier” on the devices of every person who visits those web pages (which Facebook refers to as a “Custom Audience”).
You can then serve your ads directly to that Custom Audience whenever they’re on facebook.
Google Remarketing
Google calls this targeted advertising method “remarketing”. (You can use “retargeting” and “remarketing” interchangeably.)
When you’re advertising on the Google Adwords network, Google also gives you a code snippet to add to your website to tag your visitors’ devices with your Google Ads identifier.
Thereafter, when your website visitors go to any other website that displays Google Ads, you can target them to see your ads.
3.3 Creating A Facebook Custom Audience and Retargeting Code
Following is a quick overview of how to create a custom audience and the code snippet to add to your website pages on Facebook.
(Note: The images used below are based on the current layout and design of Facebook’s Advertising environment – which changes periodicaly and may look different from your current environment.)
You may consult Facebook’s Custom Audiences guide at any time for current and more detailed information.
Instructions:
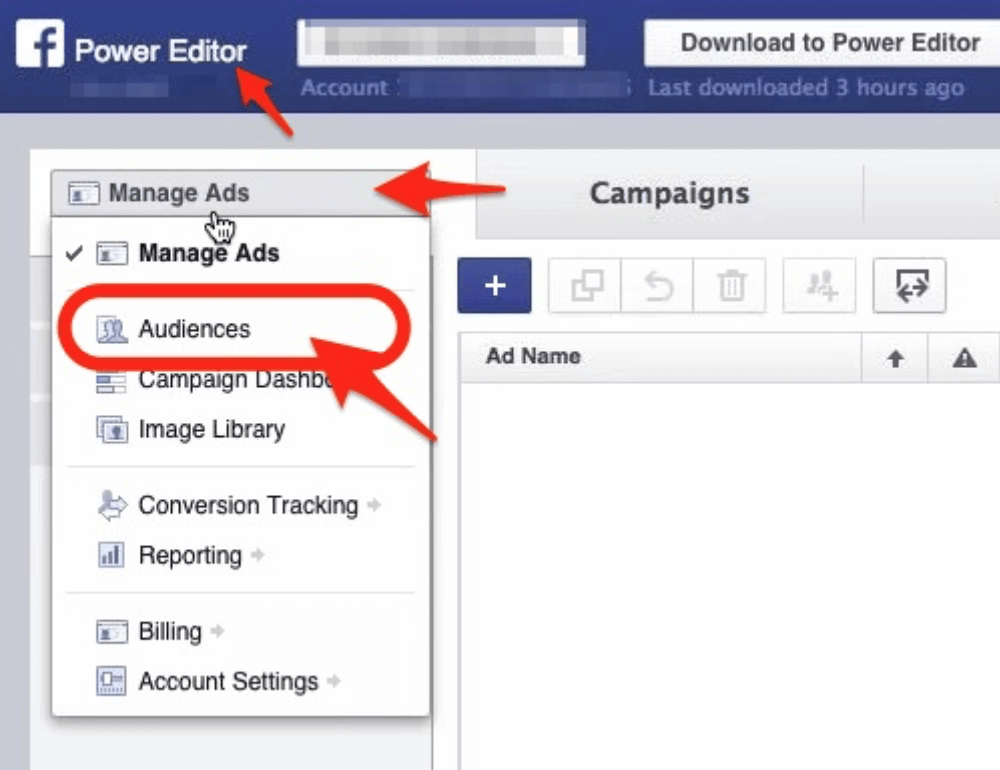
From the Facebook Power Editor, click to pull down the top left navigation menu, and select Audiences.
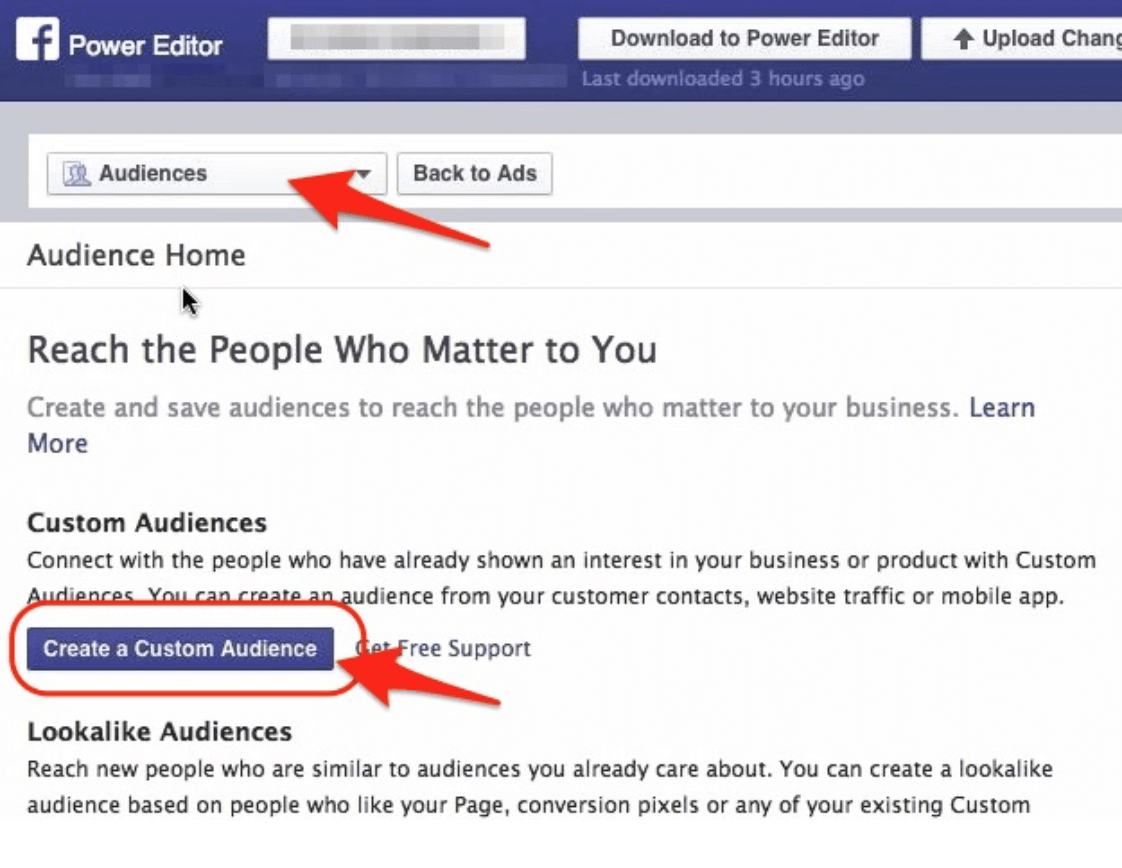
On the Audiences page, click the Create A Custom Audience button.
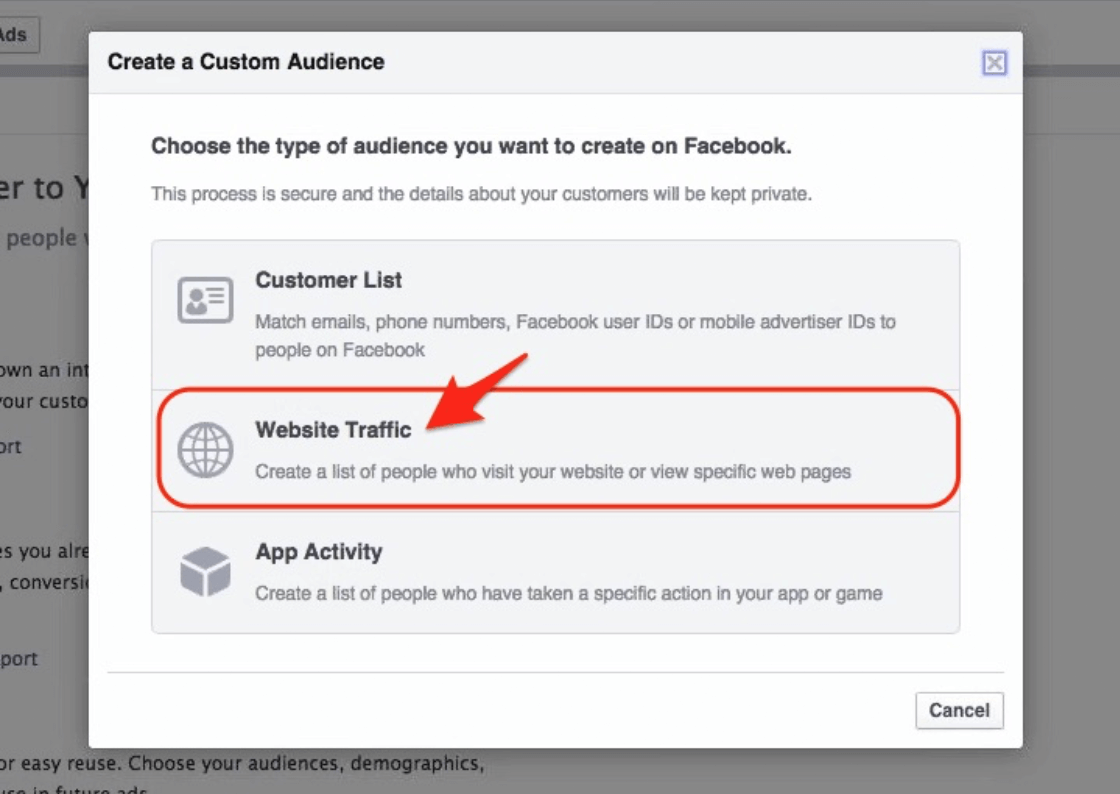
You will see a popup window with options for the kind of custom audience you want to create. This list will represent people who visited our website, so choose Website Traffic.
Before showing you the retargeting code snippet, Facebook will confirm that the code snippet (also called “pixel”) needs to be installed on your website. Check the box to accept the terms of service, then click the button to Create Web Marketing Pixel.
![]()
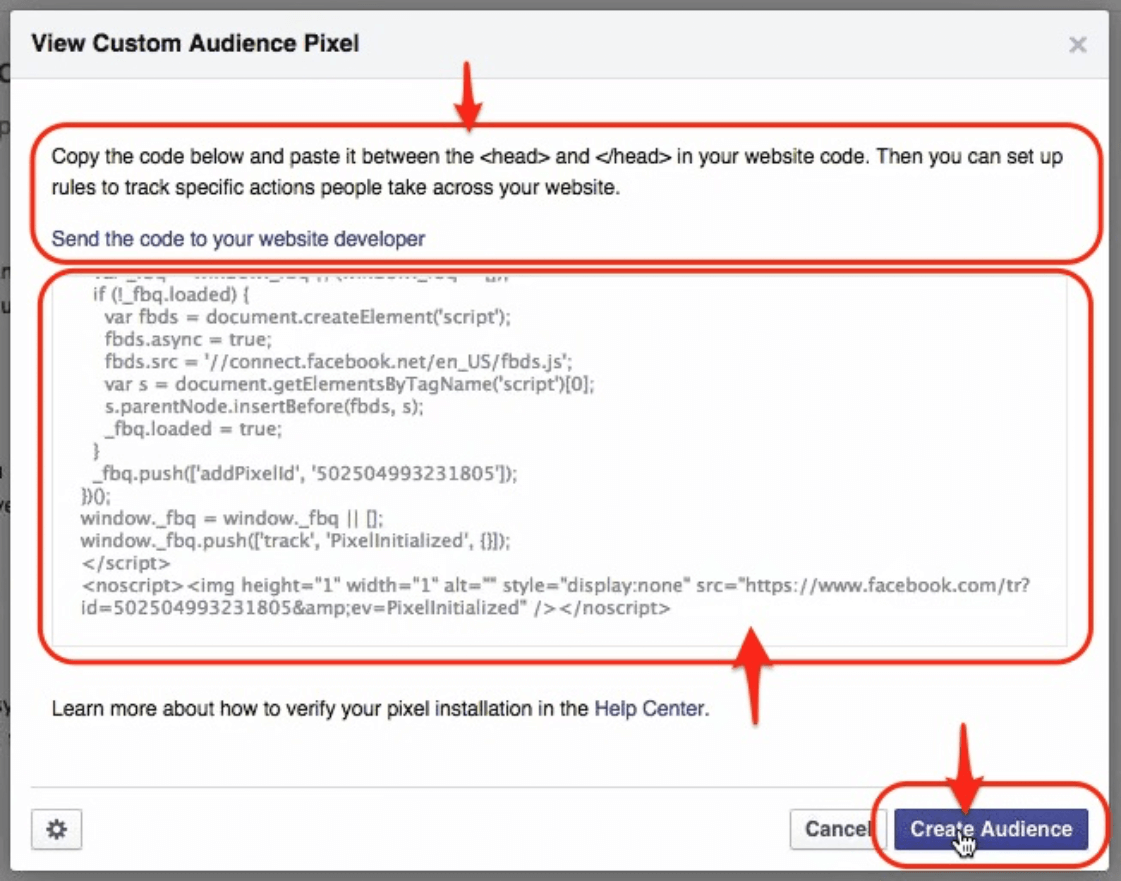
The next window shows you the retargeting code snippet (I.e. “Pixel” code) with instructions to insert the code between the
and tags in your website.If you don’t know how to do that, there is a link to “send the code to your website developer” which you can use to email the pixel code and instructions to install it to your website developer (or outsourcer).
You may want to mail it to yourself, just to have a handy record of it in your email.
When you’ve copied the code (or sent it to your website developer), click the Create Audience button to create your retargeting list.
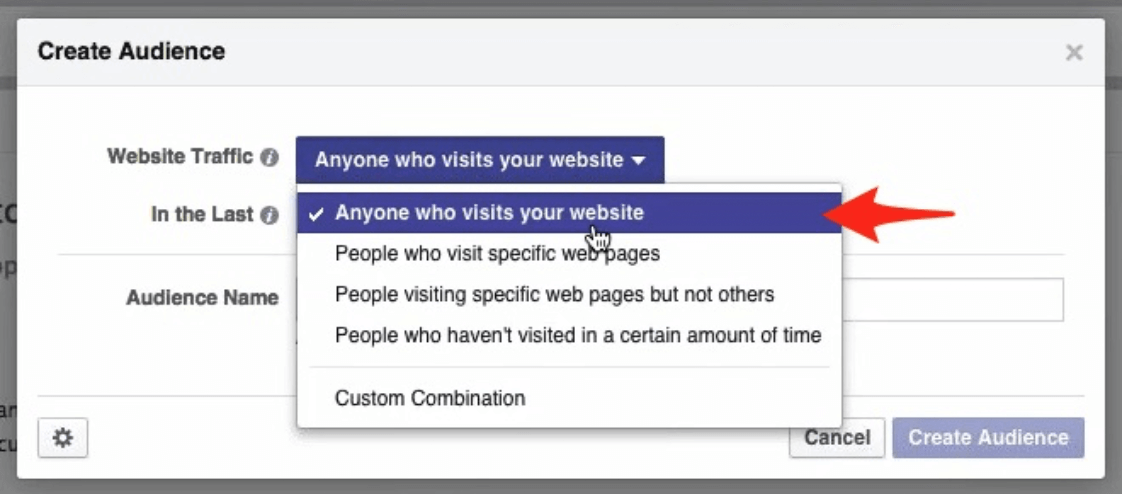
The next menu allows you to select the kind of website traffic you are tracking. When you are first setting it up, just use the Anyone who visits your website option. This will be your “catch all” list for people visiting any page on your website.
Later, you can also create a number of more specific audiences, as indicated in the drop down menu.
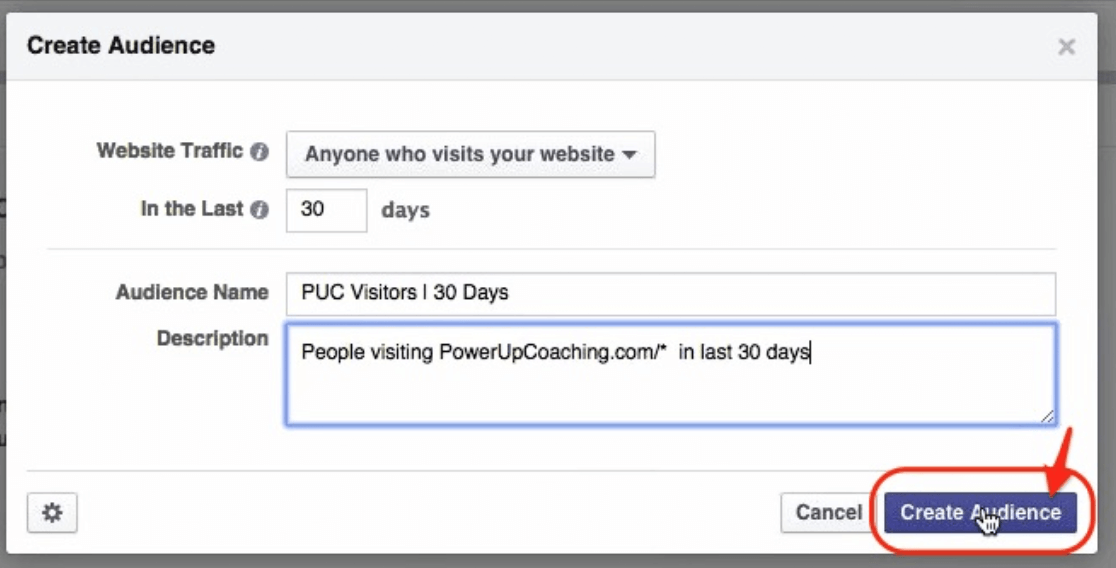
Indicate the number of days you want to track site visitors for (maximum 180), name and describe your audience, then click the Create Audience button to complete the process.
Facebook confirms that you’re done!
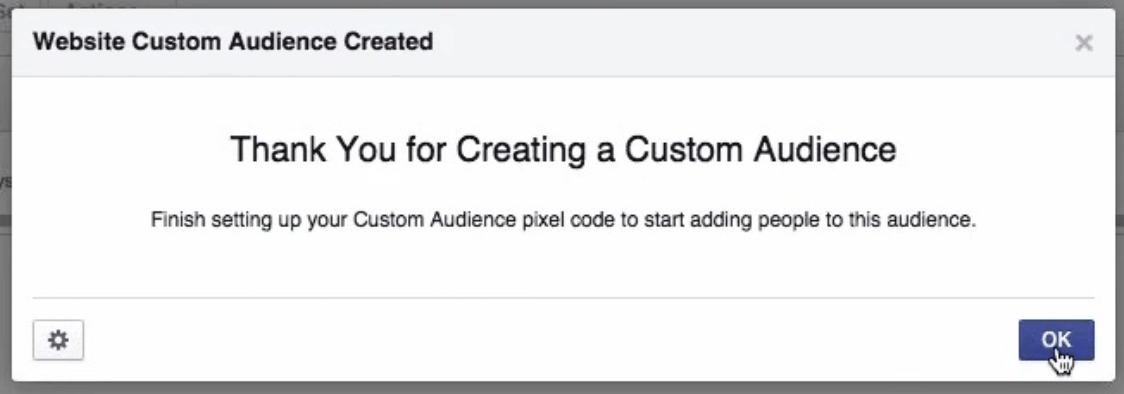
Remember: in order for visits to your website to be added to this new audience, you’ve got to add the retargeting code to your website pages!
3.4 Creating A Google Remarketing List and Code Snippet
Following is a quick overview of how to create a Google Adwords remarketing list and the code snippet to add to your website pages.
(Note: The images used below are based on Google Adwords’ current layout and design – which changes periodicaly and may look different from your current Adwords environment.)
You may consult Google’s Remarketing guide at any time for current and more detailed information.
Instructions:
Once logged in to your Adwords account, click the Campaigns menu, then the +Campaign tab to pull down a menu. On that pulldown menu, select the Display Network Only option.
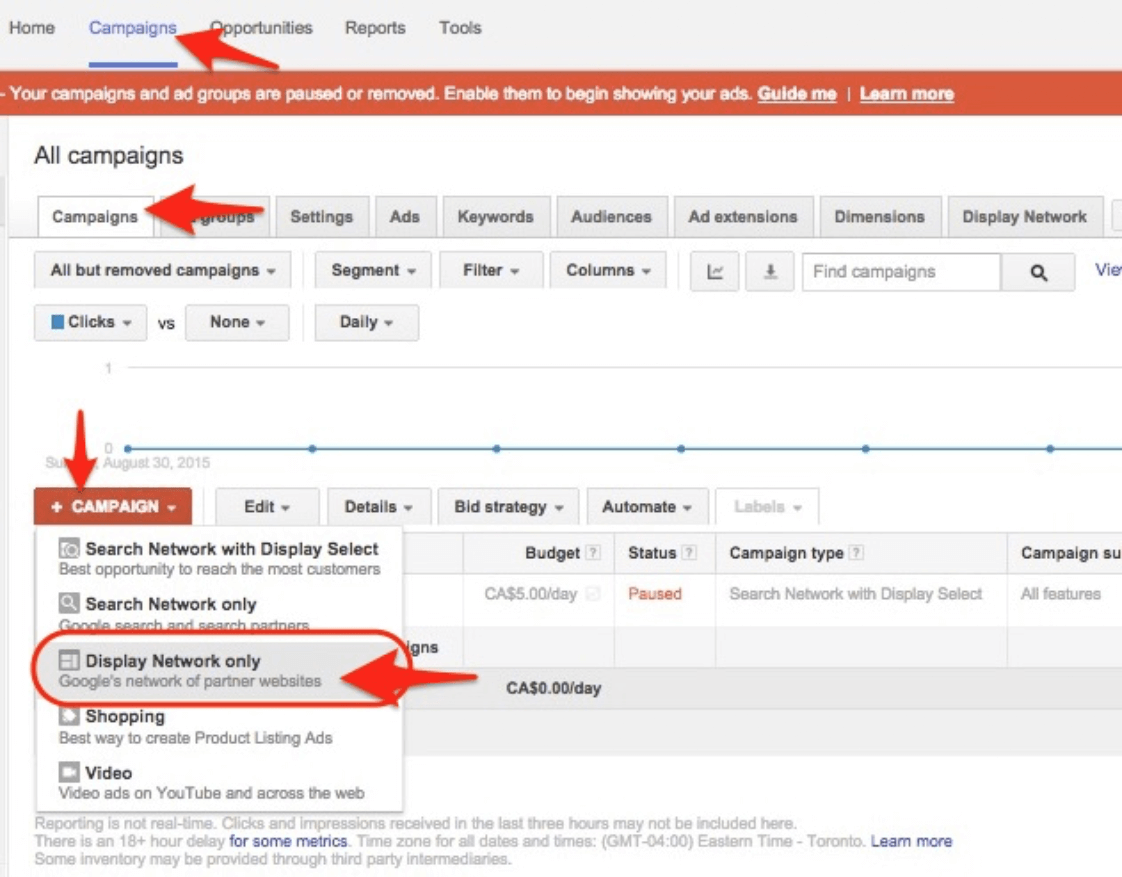
On the next page leave the Marketing Objectives radio button checked, then check the Buy on your website (includes remarketing) checkbox in the Drive Action column.
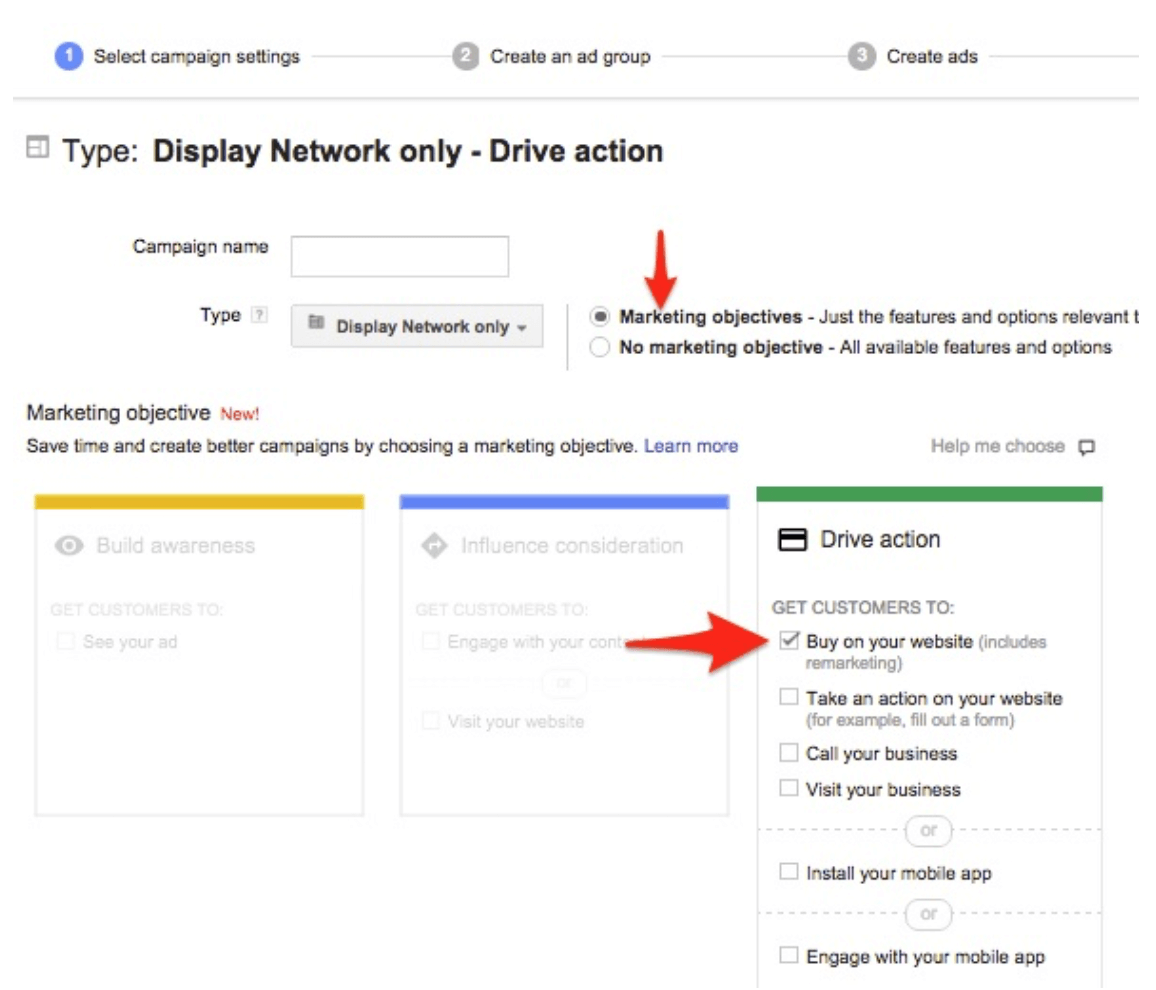
Enter a campaign name, your bid strategy and budget, then skip the Ad Set Creation process to return to the main dashboard.
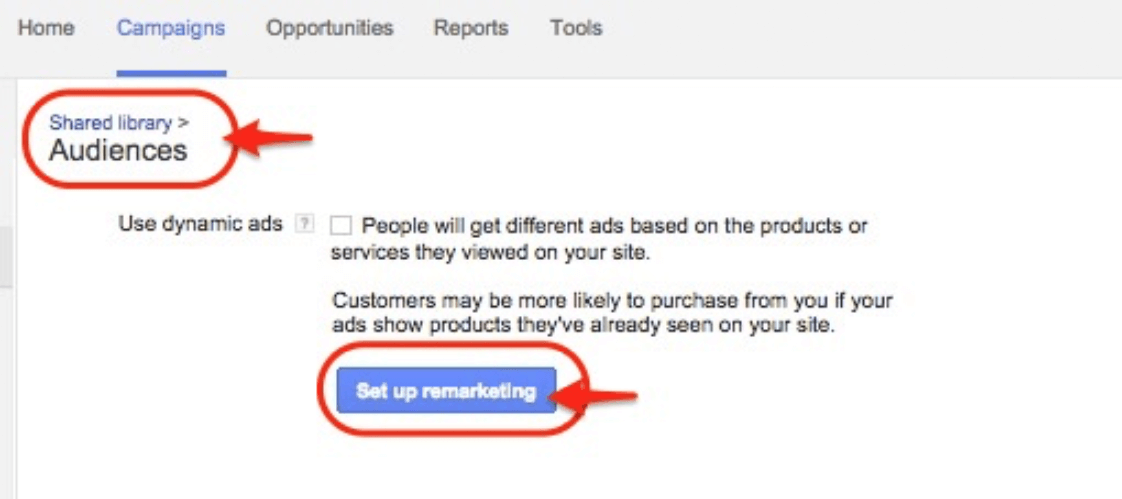
Next, select the Shared Library menu item (currently located at the bottom of the left hand side menu sidebar), and then click the View link under the “Audiences” section on the ensuing page.
On the ensuing “Shared Library > Audiences” page, click the Set Up Remarketing button.
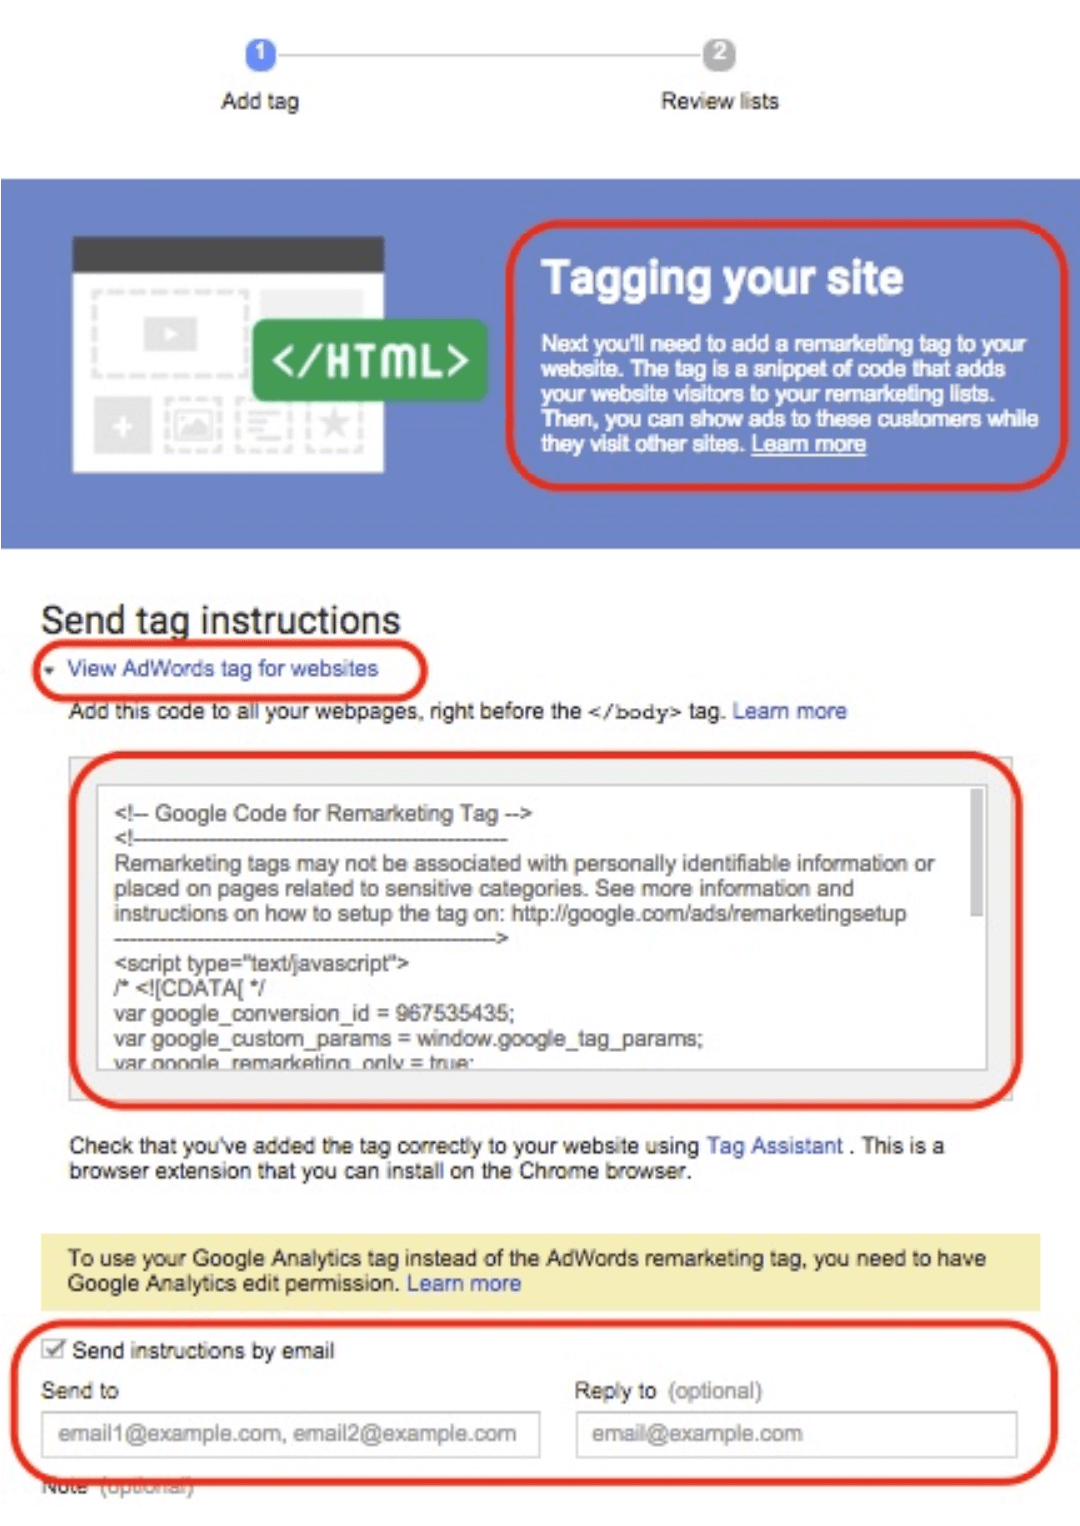
Adwods now creates the remarketing code snippet (also called “tag”) for you and displays a page with instructions for installing the remarketing tag on your website. If you are not familiar with how to do it, you also have the option to email the code snippet with instructions to your web developer.
You might want to send yourself a copy of this email first, and forward it to your web developer from your email. This way, you’ve got a handy copy of it in your own email that you can quickly find.
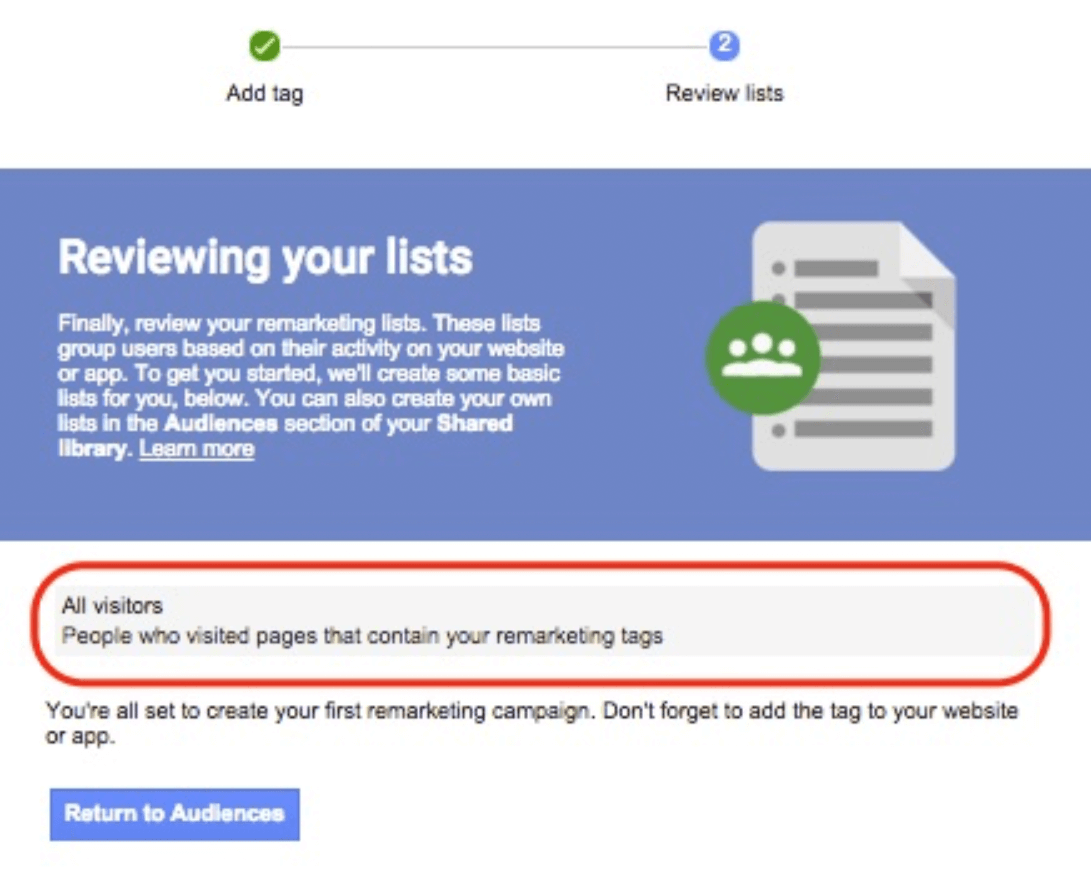
Google creates an “All Visitors” audience to get you started. This list includes everyone who visits any page on your website where the remarketing tag is installed.
Later, you can create new lists (audiences) for different groups of website visitors.
Click the Return to Audiences button to return to your Remarketing Lists tab.
On the Remarketing lists tab, you’ll find the “All visitors” list has been added to your ad group.
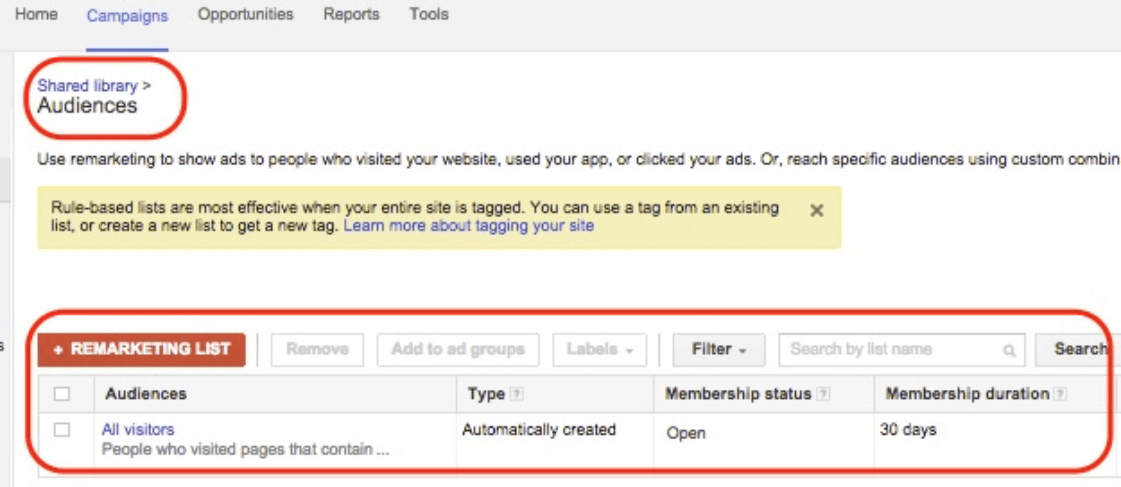
And, you’re done!
Remember: in order for visits to your website to be added to this remarketing list audience, you’ve got to add the retargeting code to your website pages!
3.5 Build Your Retargeting Audiences Now
It doesn’t cost you a thing to put Facebook and Google retargeting code snippets on your web pages.
But the only people who are added to your retargeting list (I.e. custom audience) are those who visit your web pages. So it takes time to build these lists – especially when you’re first getting started and you’re not yet getting floods of visitors to your websites.
So I highly recommend you add this code to all your websites now and start building your lists of targeted visitors.
This way you start accumulating data about all your website visitors right away, and can build up a good size retargeting audience for when you’re ready to invest in paid ads.
4. Produce Your Content
A key thing to keep in mind about this content we’re producing is that it’s meant to be part of our marketing.
That’s best done by taking a strategic approach to selecting the topics we choose to write about.
Follow the steps in this section to choose topics that:
(a) are already popular and in demand by your ideal prospects and influencers in your target market and
(b) lead naturally to an opt-in offer and sales campaign.
You’ll find the steps we follow in this section to select topics are much the same as those found in the “3 Steps Lead Magnet Creation Blueprint”, applied to a content piece, rather than a lead magnet of course.
Refer to the lead magnet creation checklist for step-by-step implementation details of the process we outline in this section.
As with many things, it’s useful to define the ultimate purpose of the content before we get started.
For our purposes, the content we’re creating has to get the attention of people for whom our products and services would be of interest and value; and to engage them in an education and conversion process that, ideally, leads to a sale.
That typically starts with a subscription on an opt-in page, after which the new subscriber is escorted along a path that leads to, ideally, the sale of a related product or service.
The first step in our content creation process therefore, is to identify the product or service we want the content to promote (and by extension, the avatar we want to attract).
That decided, our next step is to create and publish the lead magnet and opt-in page that will be the call to action in our content, and the web pages to support the sales process that the new subscriber experiences.
If you’re in the early stages of your business and don’t yet have something to sell – start with the lead magnet and build your list. You can add sales offers to the funnel later (though, it’s good to do it as soon as possible).
An essential part of our content marketing system will be to create content that influential people and websites in our market would be happy to share with their audience.
It’s helpful now to review the list of influencers you created during your “Preparation” and identify the people and websites that you want to “target” with this content. These will be people whose audience would consist of your ideal prospects (avatars).
If they’ve engaged with or shared other pieces of content on the topic you’re currently addressing, all the better. It’s a great indication that they consider this topic of interest and value to their audience.
(Just to be sure you “go one better” on the content they last shared, it would be a good idea to look up that other content as part of your research.)
And, if it makes sense for the topic or type of content you’re creating, refer to the influencers or their websites in your content. A little so-called “ego-bait” that may encourage the influencers to share.
Done? Ok … let’s move on.
4.4 Choosing An In-Demand Topic
Before our content can lead people to our opt-in and sales funnels, we’ve got to get their attention and hold their interest long enough for them to self-identify as our intended audience, and follow our call to action.
So while the content must be related to the product or service we want to sell, it should just as importantly be a topic, story, or perspective on it that captivates the viewer.
Start by reviewing the results of your “Market Potential Acid Test” and notes on any interviews or interactions you’ve had with your market thus far.
Using this information, make a list of the following:
- The core wants and needs of the relevant avatars
- The biggest questions people ask about this subject
- The most important things people should know, but don’t
- The unique features or benefits of your product or service
- Case studies and social proof (your own, or borrowed)
This list will help you come up with ideas for your content topics.
As you’re selecting the content topic, make note of the main keywords that you want your content to be ranked for.
Although google is always changing it’s algorithm for ranking content, it’s still important to help google identify what your content is all about.
If you do a good job of promoting your content and receive enough links and shares, google will consider your site more authoritative and more likely rank you for the SEO keywords you’ve optimized for.
Now, you don’t have to be an SEO expert to do a great job of this. Here are the essentials:
- Find the top 3-5 keywords that relate to your topic / content. Don’t worry about getting the “long tail” phrases with little competition. Use the main keyword phrases with the most traffic, that are RELEVANT to your content.
- Use the MAIN keyword phrases your headline, titles, meta-descriptions, and in the opening paragraphs of your content.
- Use the other keyword phrases where in your content where it makes sense. Don’t use them artificially. Don’t repeat them endlessly. This will not only NOT help your SEO, it will hurt you.
- When possible, emphasize the keywords by using them in the heading 1 and heading 2 titles in your content; or mark them with bold or italics.
- Use the Yoast WordPress SEO plugin to help you analyze your content for SEO optimization and to populate your page titles and descriptions.
It’s worth emphasizing that you are better off to optimize your content for the viewer experience, and not for the SEO bots.
Links back to your content are far more value to Google than content optimized for keywords. If your content doesn’t “WOW” the viewer, you are hit with a double-whammy: your viewers won’t share or subscribe; and Google won’t consider the content worth showing in the search engine results.
4.6 Strategic Elements of Your Content
We’re not going into detail about producing your actual content piece – that’s a subject onto itself. However, for the purposes of our content marketing process, we want to emphasize that a main goal of this content is to lead interested people to an opt-in offer and sales process.
To do that, we want to be sure the content contains multiple opportunities for the reader to take that next step, including:
- Hyperlink text that may or may not contain a specific call to action, but is clickable. These links are natural on the web and are more subtle and unobtrusive. Sprinkle the content liberally with them as long as the links seem to flow naturally as part of the content.
- Call out boxes that stand alone in the content, broken out from the rest of the content, often with an attention-grabbing background color and border. The call out boxes may contain more direct opt in offers.
The call out box may contain links to the opt-in offer on a separate page or, as is becoming more popular, pop up a lightbox with the optin offer.
Note: The latter is typically called a “two-step opt-in” because the subscription form is only displayed after the call to action link/image is clicked, rather than appearing inline with the content.
You can usually have one or two call out boxes in your content without it feeling pushy. Of course, the longer the content, the more you can have.
If the call out boxes offer different opt-in incentives, you can have even more because they are perceived as individual value-added add-ons to the main content.
Opt-in forms themselves may also appear in the content, either as inline forms or buttons and design elements that trigger a two-step opt-in.
With your strategic calls to action embedded nicely into your content, it’s time to publish the content to the blog on your main site.
If your original content was a youtube video, embed the video on your blog, and include a transcription of the video, or comprehensive notes.
This will not only be helpful for people who prefer to read articles than watch videos, it’s also critical for your on-page search engine optimization.
And remember – if you haven’t already: be sure you add remarketing code to the web pages with your content.
5. Promote Your Content
Once your content’s published to your blog, it’s time to get the word out. We’ll assume you’re on a once-a-week content publishing cycle: you publish the content on Monday and you promote it for the entire week.
Although your promotional content will be released throughout the week, it’s ideal to produce it all in one day, rather than to have to allocate time every day throughout the week to it.
To accomplish this, I recommend you use one of these popular and effective content scheduling tools: MeetEdgar, Buffer, HootSuite, TweetDeck, CoSchedule, Sproutsocial and Onlywire.
Email Subscribers
Create a series of 3-4 emails to your subscribers. Send the first email the day you publish your content, and the rest evenly over the ensuing week – one every two days.
Each email should focus on a different benefit for the subscriber to visit your blog and read the content.
For example, you could highlight a big problem it will solve; highlight a significant outcome or result it will create; show a case study for social proof; tell a story that connects with your subscribers or tugs at an emotion; etc.
Many people write these emails one at a time, on the day they are to be sent. But I suggest you write them all at once, or at least outline their content all at once. This helps you create continuity through the series, and know what upcoming content to tease at the end of each email.
Preparing the messages all at once also allows you to tell a story over the email series, and make people want to keep reading each one to see how it resolves.
That’s a great way to keep people opening and reading your emails – each one creating more interest and desire to “get all the details” in the content on your blog.
What you don’t want to do is to just send multiple “announcement” emails. That will make your subscribers feel nagged and send them straight to the “unsubscribe” button.
Social Connections
Post about your social connections network daily if possible, or at least every two days.
For sites like Facebook, Google+ and Twitter, where vast amounts of content scrolls past the members throughout the day, consider posting 3-4 messages daily.
For those without a fast-moving “feed”, once a day posts should suffice. For example, it should be sufficient to post one image a day, every 1-2 days on Pinterest and Instagram.
The key here is to know and use the frequency that maximizes the chance of your content promotion being seen on the social channel you’re using.
Key point: Be sure to link each post back to the original content on your blog.
Media Connections
If you’re creating content for a media channel like Youtube or Podcasts, promote to these audiences in much the same way as you do your email subscribers.
By that I mean, you will create content specifically designed to create interest in the topic, and desire to get the full story by clicking over to the original content on the blog. And you’ll do that at a publishing frequency which is typical for that channel, for example:
-
If you have a Youtube Channel, produce 3-4 promotional videos to your Youtube subscribers. publish these on the same Day 1,3,5 and 7 schedule as your email series.
Make each video 2-3 minutes in duration. That is enough time to highlight a problem, solution, benefit, social proof, etc and create enough curiosity for your subscribers to click over to the original blog content for the rest of the story.
- If you publish a podcast, focus that week’s episode(s) on the subject of the blog post. If you have a long podcast (more than 10 minutes) consider injecting some 2-3 minute breaks where you discuss the subject of the content and drive listeners to the original blog content for the full story. The key goal: use the podcast to promote your blog content that week.
Reach out to all your the key influencers in your database whose audience would be a great fit for your content.
Let them know you’re a fan and subscriber and that you just published some content on a topic you noticed is popular with the influencer and her audience.
Invite them to look at your content and give you some feedback and, if they like it, to share with their audience.
Keep the email short and to the point. Be professional and courteous, not assuming or demanding.
Not all your influencers will share the content or give you feedback (much less respond), but don’t let that deter you from making this outreach a consistent part of your content marketing process.
If you continuously produce valuable and relevant content, on a predictable schedule, targeted to the right audience — a fair share of these influencers will share your content, or at least give you feedback to make it better.
Remember, these influencers are likely inundated by similar requests. Don’t take it personally – it’s not. Support yourself by interpreting every influencer “no” or “no reply” as “Not this time, thanks. Let me know when you publish your next piece of content”.
Reach out once on the day you publish your content. On the fourth day, follow up with everyone who did not reply with “just making sure you got this” email.
Follow up immediately with any influencer who replies to your email or shares your content.
On the day you release your content, boost reach and viewership using paid ads on Facebook targeting both your existing audience as well as potential new leads.
Over the course of the week, run ads continuously to the extent your budget allows to continuously drive leads from your existing audience, from the remarketing lists you’ve built up, and related (carefully targeted) audiences.
6. Summary
There you have it: a process for publishing and promoting content that ensures the content you so thoughtfully created reaches as many people as possible, and encourages the interested ones to take the next step in your education and sales process.
Follow this framework to the “T” initially. As you get into a rhythm you’ll find ways to customize and optimize it.
The key thing is to make it a ritual you follow to leverage the maximum results from every piece of content you produce – in a systematic and – eventually – automated way.